Friday, August 28, 2015

Tres Leches " Three Milk(s) Cake

What can I tell you about Tres Leches, as the name indicates its a Mexican cake that is soaked in 3 types of milk; evaporated, condensed and heavy cream.


The first time, I tried this cake it just blew my mind. It was so well soaked in the milks and yet so firm. I just had to learn her to make it. Its very simple once you understand what and how to make it special. 

This cake is very  popular in Central and South America, North America , and many parts of the Caribbean. The origins of the tres leches are disputed, however the idea for creating a cake soaked in a liquid is most likely of Medieval European origin, as similar cakes, such as British Trifle and rum cake, and Tiramisu from Italy, use this method. Recipes for soaked-cake desserts were seen in Mexico as early as the 19th century, likely a result of the large cross-cultural transfer which took place between Europe and the Americas.


This is a very simple yet very delicious cake and it can be served in many different ways ; as simple as you want or as fancy as you can imagine. Other than the 3 milks that are used to soak the sponge, you can add other flavors such as caramel or  dulce de leche or coconut milk.


If you are to add any whipping cream and fresh fruits please ensure that the cake is consumed within 2 days; I don't have that problem in my house, not with this cake! I have done this cake so many times , each time differently its one of those cakes where it gives you so much room for imagination.

It is s advisable to use the sponge that has no butter or any fat, this results a very light cake, with many air bubbles(sponge cake). This distinct texture is why it does not have a soggy consistency, despite being soaked in a mixture of three types of milk.

Like any other cake I like this one in summer but you can prepare it anytime of the year and you don't have to add fruits; believe me its so delicious on its own.  


Ingredients:


For (1) 9"pan or 9 x 13

01 Cup granulated sugar

05 Egg Yolks

05 Egg Whites

1/3 Cup milk

01 tsp vanilla

01 Cup All Purpose flour

1 1/2 tsp Baking Powder


For (2) 8" pan

1 1/2  Cups granulated sugar

08 Egg Yolks

08 Egg Whites

1/4 Cup milk

1 1/2  tsp vanilla

1 1/2 Cups All Purpose flour

2 tsp Baking Powder


For the 3 Milks

3/4 cups evaporated milk
3/4 cups sweetened condensed milk
3/4 cups heavy whipping cream or double cream

You can have more , I prefer to mix a little and add more when required rather than mixing a lot and I am left with a lot of leftover mixture of the 3 milks.

To make the cake:
1. Preheat the oven to 350 degrees F. Lightly grease and flour the pan and set it aside

2. In the bowl of a mixer, beat the egg whites on low speed until soft peaks form. Add 
    the sugar gradually with the mixer running and peak to stiff peaks.

3. Add the egg yolks 1 at a time, beating well after the addition of each.

4. Sift together the flour and baking powder and add to the egg mixture and mix to 
    combine quickly you do not want to over whip it will deflate it.

5. Bake for 25-30 minutes, let it cool just enough to remove from the pan.

6. Remove the cake from the oven and while still warm, pour the cream mixture over it.
    Let sit and cool to room temperature. Cover and refrigerate until well chilled, at least 4 hours or overnight.


Sunday, August 2, 2015

Soft and fluffy Cinnamon Rolls

Who doesn't like a good soft and fluffy cinnamon roll? and its much better if it is so easy to make. I love cinnamon rolls with a glass of cold milk anytime of the day.

There are so many great recipes out there, just experiment and pick the one that works for you, I have 3 recipes but I prefer to use this one because its very quick and the results are just perfect.

Cinnamon Rolls/Buns are presumed to have originated from Sweden, known as Kanelbulle which literally means Cinnamon Bun, however the dough also contains  powdered/buds cardamom to give the distingtive flavor.


Cinnamon Rolls consists of roll sheets of yeast- leavened on to which the cinnamon and sugar ( brown) is rolled on thin layer of butter, sometimes with nuts or raisins. The dough is then cut into individual portions which can be baked or fried. In North America a heavy glaze of powdered sugar or cream cheese is used on the top. In Northern Europe 'nib sugar' is used with glaze instead of icing.


The size of Cinnamon Rolls/Buns vary from place to place and also the varieties of similar method such as Honey Bun, Cinnabon, Chelsea Bun , Sweet Roll or a Norwegian Skillingsbolle, Cinnamon Snail, Cinnamon Swirl etc


Cinnamon Rolls are commonly served for breakfast as well as brunch , in my house we do brunch and evening snack time


Ingredients:


1 cup warm milk
2 eggs
1/4 cup/4 Tbl  melted butter
4 cups/520gms  All purpose flour
2 1/4 tsp yeast ( 1 packet – 7gms)
1/2Cup /100gms  granulated sugar
1 tsp vanilla

For the filling
1 cup /200gms brown sugar
2 Tbs cinnamon powder
1/2 cup/113gms soft butter

For the glaze
1 cup /125gms powdered sugar
3 Tbs milk
1 tsp vanilla
1 Tbl corn syrup


For virtual tutorial please click the link below:

Saturday, August 1, 2015

Zanzibar style Fruit Salad


Back in the days in Zanzibar when you utter the word fruit this is what you would get, a mashed papaya with chopped crunchy fruits and may be if its a special day or you are special enough then it will be topped with ice cream and its heaven on earth!!!

How this combination of various fruits is label just "fruit' is a mystery to me because all other  are known by their own respective names. In short this is what can be called fruit salad.May be it was meant to be called
" Fruits" and the "s" disappeared in the fruits.

Fruit was always a special thing for me as a child, we were treated with this only on Sundays or special occasions. It was always made at home of course but we never had ice cream containers in our freezers, however, the ice cream kiosk at Frorodhani served only fruit with ice cream and I think it was only one flavor ice cream they served then , Vanilla.

Forodhani is an open park located along the main walk of stone town and partially facing the beautiful Indian Ocean. Forodhani is the happening place in the evenings for the locals and the tourists when you are in Zanzibar. There is no special season or reason for one to visit Forodahani. 

As a child every evening we visited the park and enjoyed the Zanzibari street food as well as the well known Swahili delicacies under the beautiful sun set. Its a kind of peaceful atmosphere , a place were friends and loved ones met and exchanged greetings and a fashion parade for women to flaunt their latest styles in clothes, jewelries , shoes etc.

Forodhani always stays live with crowd till late evenings but for us children , we used to rush home as soon as we heard the sound of the fired cannon at every dusk, this coincided with the evening prayer time as well.

So much about the venue and not my fruit, so here we go.


Please note Papaya makes the base of the fruit salad, the rest of the fruits are as per your preference

Ingredients:

1 medium size papaya - peeled and sliced
1 orange - peeled ,cut into small pieces
2 Bananas - peeled , sliced, please squeeze lemon to prevent it from discoloring
1 Apple - Peeled , sliced into small pieces , squeeze some lemon/lime to prevent from discoloring
1 Cucumber , peeled , sliced into small cubes
Sugar and lemon are optional

For the method, please click on the video below

Wednesday, July 29, 2015

Fattush/ Fatoush/ Fatouch Tangy Lebanese Salad


Fatoush  is a very colorful Levatine Bread Salad made from toasted or fried pita bread pieces with the garlicky and tangy salad dressing with touch of sumac , parsley and mint and is then tossed  in a bed of beautiful green romaine lettuce and cucumbers , the bright red tomatoes and striking white and red radishes to form an attractive and unique salad.  

As far as I know Fattush is widely prepared in Lebanon, and also in many other Mediterranean and Arab countries with minor variations. Fattush is usually served as part of "Mezzeh or Meze" an appetizer along with several other finger food dishes before the main meal, but it can also be served with the main meal if you wish.

Sumac powder is what makes this simple salad very unique and phenomenal , the sourness of the Sumac powder blended with the herbs is what attracted me to this salad at one time it almost became my staple diet.
Sumac is red , aromatic, lemony and velvety coarse powder that is derived from berries of a bush which grows wild in most Mediterranean regions and also in the Middle East. It plays a very important role in Arabic cooking as a preferred ingredient to lemon for sourness and astringency . 

There are many other varieties of Sumacs ( about 35) that grow throughout the world in subtropical and temperate regions. However, they are NOT edible so be careful not to pluck any wild bushes that grows in your back yard, it will certainly give you a severe rush. 

Besides the Fattush Salad, Sumac is used in varieties of dishes, as well as marinade for kababos and   refreshing drinks and not  forget the medicinal benefits to some extent.   

This is a very tangy and juicy salad, however try no to over power the salad with alot of acidity it can be overwhelming .

The ingredients listed below are for 2 or 3 portion depending on how you serve it

1 heart of Romain Lettuce 
2 Medium size Tomatoes ( cut into medium size cubes)
1 Medium size cucumber ( cut into medium size cubes)
3 Radishes ( Optional)
2 Green/Spring onions ( Optional)
1/2 or more pita bread chips ( fried or toasted)
Black Olives ( Optional)

For the dressing

1/2 tsp fresh garlic
1 tsp Sumac powder
1/4 tsp Paprika (optional)
2 tsp lemon/lime juice
1/4 cup red onions finely chopped
3/4 Tbl Olive oil
2 Tbl chopped parsley
1 tsp chopped mint

Salt& Pepper to taste

Method:

Thursday, July 23, 2015

Caesar Salad with( Mayonnise)

I (used) to love salads, I still do but I don't make as much as when I was single. When I say that I mean that I used to eat salad as meal its one of the easiest thing to put together when you are on the run, but now with children we have salad as side dish or as an appetizer. Caesar Salad has always been one of my favorites and if I were to have it as a meal than definitely some grilled protein to go along with it. 

Caesar Salad in my opinion very simple, just Romano leaves and croutons, isn't it?  

Well, the most important of this salad is the dressing, it is as simple as that. The original recipe calls for coddled eggs (yolks)  which many people are very sensitive on this issue and that is why I have decided to make the recipe with mayonnaise (home made mayonnaise has raw yolks too!) but for the sake of convenience and simplicity  I am using store bought mayonnaise but you can make your own mayonnaise and make a dressing if that makes sense. 

Caesar salad was created by an Italian immigrant  Caesar Cardini who operated restaurants in Mexico and the US. As per his daughter Rosa Cardin, her father invented the salad when 4th of July 1924 rush depleted his kitchen supplies. He was left to work with the minimum so he created dramatic flairs of the table side-tossing . Like many well known recipes Caesar Salad has its controversy when it come to the usage of anchovies. His daughter Rosa mentioned that the original Caesar Salad did not contain pieces of anchovies , the slight anchovies flavor comes from the Worcestershire Sauce. The first documentation of Caesar Salad was dated in 1946.

The ingredient are for one portion as per your taste buds

1  Romaine Lettuce (heart)
1/4 tsp crushed garlic ( 2 cloves)
4-5 pcs Anchovies or 1/2 tsp anchovies paste 
1 Tbl mayonnaise
1/4 cup croutons
Salt to taste 
Pepper to taste
2-3 Tbl extra virgin oil
1/2 tsp lemon juice
1 tsp Worcestershire sauce 
Cheese - Parmigiano Reggiano or Parmesan Cheese


Method:

Soak and wash the romaine lettuce, keep it on a flat surface and pat it dry with kitchen paper

Mash the garlic and anchovies separately

In a medium glass, plastic or steel bowl whisk together the garlic and anchovies, add black pepper gradually add mayonnaise , lemon juice,  Worcestershire sauce and whisk until well combined, taste to see you how you like it.

Slowly drizzle the olive oil while whisking until well combined and thick

Add the grated cheese ( if you wish) 

Toss the salad with the dressing, add crutons and toss again. Sprinkle more cheese on the top if you wish . Enjoy your perfect salad


Ensaimada/Ensaymada

Ensaimada is a sweet pastry originally from Mellorca, Spain but has traveled its way to the former Spanish colonies such as Latin America as well as the Philippines. I understand that the recipes goes way back to as far as 17th century and in those days wheat flour was known to be used for this pastry dough and the products were made for special occasions and festivals.

The traditional Ensaimada de Mallorca was made with strong flour, yeast, eggs and a type of reduced fat lard called Saim( that's how the name is derived from)  which enhances the flavor and elevates the pastry layers.

The Philippines, as a former Spanish Colony for over 300 years has also adopted Majorca Ensaimadas with varieties that have evolved over the centuries and has come to be known as a popular and common delicacy in the country. The fillings for Ensaimadas varies from savory with variety of cheeses to sweets such as chocolate, coconut and various jams. The localized pastry is a brioche baked with butter instead of lard and topped with grated cheese and sugar and upscale version are topped with buttercream and sugar.

Well, my story with Ensaimada did not began with any of my friends from the Philippines ( they used to bring me brownies from Goldilocks, mmmh) it began with a picture in one of the cooking groups on Facebook. The lady does know how to take good pictures, its those pictures that make you want to eat the food right from the screen! That reminds me that I gotta invest on some good camera instead or relying on my dear phone, it does help since I have no option at the moment. So from the picture , I asked for a recipe and I did make the Ensaimada about 2 years ago, my kids love them and I used various filling and made up my own such as cinnamon and brown sugar, caramelized apples , pecan etc

This year I decided to go deeper and do some research on the pastry and I was amazed to find a lot of Hispanic videos that I did not understand what they spoke about but I did not stop there, I watched about 8 YouTube videos from various Latin chefs and home cooks , and went into the blogs hopping to be able to find a button somewhere to translate but all in vain. The various videos did extend some idea on how to go about it but I wanted more and I finally did find an English blog but the measurements and technique differed. However ,  it is through this blog I was able to find out that the fat used was lard and that I could substitute it with the vegetable shorting such as Crisco ...so there's my Ensaimada story and I intend to try and roll my dough with the butter like the Filipinos , it will probably turn out  be somewhat like the croissants just less richer... I love these pastry fro brunch or evening tea, they are just perfect. did I mention that I am proud of myself? Yes I am and I am smiling too as I type this. Happy rolling!

Ingredients:

4 cups all purpose flour
1/3 cup sugar
2 1/4 tspn yeast
1/4 tspn salt
1 cup milk ( warm)
2 eggs
2 Tbs olive oil
6 Tbls vegetable shortening

Method:


Using a dough attachment in a mixing bowl or stand mixer, combine the flour, sugar and yeast

Add warm milk and eggs, and olive oil mix well to combine and knead for about 5 minutes, the dough should sticky but firm.

Cover it and let it rise to double the volume

Once risen, divide the dough into the amount of pastry you wish to have it could be a single but big or small ones

Use fat on the rolling surface and place a portion of the dough, apply some fat on top of the dough and roll to as thin as it can get ( coat the fat as you roll)

Close to one end, add the filling horizontally or diagnostically preferably with the pastry or zip log bag and fold to cover the filling then roll along till the end. Roll into a coil.

Cover the pastry and let it rise for the second time.

Bake at 375F for about 20 mins, let the pastry cool, sprinkle some powdered sugar and serve


Wednesday, July 22, 2015

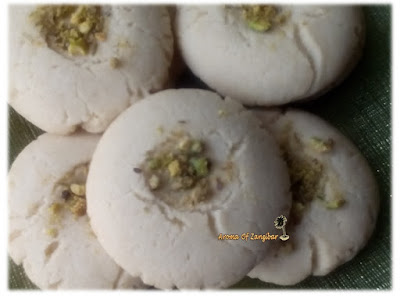
Nan Khatai ( Cardamom Cookie)


Nan Khatai is an Indian short bread cookie with aromatic flavors that makes these cookies hard to resist. Honestly I am not a cookie fan at all but these cookies are so delicious, very soft and melt in your mouth its just too hard ignore them. The ghee and the touch cardamom brings the Nan Khatai to total different level, and not to forget the yogurt that gives a very soft and tangy taste in you mouth. The Nan Khatais are not very sweet, they are just perfect for that cup of sweet cardamom tea.

When I was growing up in Zanzibar as well as in Dar-es-Salaam we used to buy what we called in Kiswahili as Nangatai ( the pronunciation was lost somewhere in transit) but the Nangatais that we had and I believe until now they were very big almost the palm size and they had a big red or orange dot in the middle, the texture as far as I can remember was very crumby and dry they tasted vaguely the same. I assume that the orange dot was a dash of saffron. Pistachios were not very popular at that time. Nangatais were and are still served with an evening tea on daily or special occasion.

Its not a mystery to assume that the Nan Khatai were brought to East Africa by the Indians, considering the very obvious and prominent Gujarati population and culture in East Africa and of course the British left us with their signature evening tea which is a typical norm of any home in Zanzibar. The tea or Chai as we call it in Kiswahili is prepared with fresh milk and infused with plenty of crushed cardamom seeds and served in a very aristocratic tea cups. If you were to be invited to any home, you will notice that the hostesses were very proud and loved to flaunt their tea sets ( am not sure if its still the same, my grand mother did) with embroidery or lacy serviettes.  

This recipe was not prepared by me but I tried and tasted , made changes and approved it !! so I can safely say..Its to die for!!!
Ingredients:

Yields: 12 cookies


1 Cup All Purpose Flour
1/2 Cup Semolina
1/2 tsp Baking Powder
1/4 tsp Baking Soda
1/2 Cup Powdered Sugar
Ghee/soft butter or Melted Butter or combination of the two 100 gms/ 3.5 oz or 7 Tbl
2 Tbl yogurt

1/4 tsp Crushed cardamom 
1 Tbl crushed Pistachios


Method:


Pre heat the oven to 325, sift the combine all the dry ingredients together

In a stand or hand mixer, combine the fats and powdered sugar together , beat to light and fluffy mixture.

Add yogurt, beat for few minutes

Add the flour mixture to the fat mixture and mix though with hands thorough, you will get a soft dough.

Cover and keep aside or refrigerate for about 30 minutes to rest

Divide into 12 equal size portions, roll them into your palms to make size of a golf ball. Keep enough space in between. 

Press it within the palm to flatten it, make a light indentation in the middle using your thumb or a measuring spoon.

Place the cardamon and pistachio mixture

Bake for about 18-20 minutes, the cookies should not be brown or tan

Once they are out of the oven, leave them on the trey for about 10 mins and then keep them on cooling rack until completely cooled. 

Serve and enjoy it with your CHAI!

Thursday, July 2, 2015

Vilosa ( Sweet rice dumplings)

Vilosa are something you are likely to be served if you are visiting a Zanzibari home especially during the month of Ramadhan, or for any special dinner. The prominent ingredient of this delicacy are rice flour, coconut milk and cardamom. Some vilosa are prepared with samolina but I prefer mine with All purpose flour which makes them extra soft, especially once they are totally soaked with the saffron syrup.

To my understanding, vilosa are true Zanzibari in terms of origin, they actually resemble the modern vitumbua but they differ in taste. I have always preferred vilosa especially the way my grand mother makes them, hers are actually golden in color , well she can afford a lot of saffron! They do taste a lot richer and of course to top my vilosa I love to have them with Saffron tea...its out of this world.


Anyways, lets get back to these wonderful babies. You can use whole rice , you will need to soak it over night and then you will blend with the rest of the ingredients.

Ingredients:

Yields 20 vilosas

1/2 cup rice flour
1/2 cup all purpose flour
2 eggs
3/4 cup coconut milk
1 1/2 tspn yeast
1/4 tspn cardamom
pinch saffron
1 tspn vanilla or rose water
Ghee or oil for frying

Method:


Place all the ingredient except the oil in the blender and mix well. 

Put it in a big bowl and cover it

Let it rise

Please watch the video for visual idea on frying the vilosa

* If you wish to make more, you can double the recipe into 2


Punjabi Samosas

If you have been to India or hung around with Indians or just dined in an Indian restaurant, then you will know what am talking about. And if you don't know what I am talking about...please be my guest and learn about this very famous street food that has also been upgraded to fine dining as an appetizer.


Punjabi samosas are very crispy and flaky pastries that a filled with generally potatoes sometime peas are added and at rare occasion with minced meat. They are usually very spicy but I have found a way to make them flavorful without the heat.


Punjabi samosa are very common in almost all the cities in India and they are served on they own with some chutney be it mint, coriander or tamarind ( hot & sour or sweet & sour)  and in many occasions they are served with chaat or chaat masala , this is a different informal delicacy altogether.


Ingredients

Yields 8 standard samosa

For the Pastry

2 1/2 cups all purpose flour
4 Tbls Clarified butter/ Ghee or oil/ melted butter
1 tspn carom seeds
1/4 tspn salt
1/2 cup water ( may be less or more)


Method

1. Combine flour with salt, carom seed and ghee

2. Mix and rub with your fingers to make sure all the flour is coated with fat and free 
    from any lumps

3. Add water slowly and knead to  form a hard ball,

4. Cover the dough with cloth and let it rest for about 20 mins or so


For the filling: 
(The ingredients below can be altered as per your taste)


250gms  Boiled potatoes ( mashed into big chunks)

1 1/2  tspn Cumin seeds
1 1/2 tspn chili powder
1 1/2 stpn garam masala
1 1/2 stpn coriander powder
1 1/2 tspn cumin powder
1/2 tspn salt
Chopped cilantro/coriander
2 Tbls oil or ghee to saute
1/2 lemon or lime


Method:

1. Place a sauce pan on a medium heat, add fat

2. Add whole cumin and spread it to coat the fat, let it saute for 1 minute or so

3. Add the rest of the spices and mix through

4. Add the potato chunks and mix to coat well

5. Squeese lemon or lime, and cilantro and mix well

6. Turn the heat off and let the potato mixture cool.


Filling the samosas

1. Divide the dough into equal portions ( balls)

2. Dab one ball with little oil at the bottom

3. Roll it like a chapati or round shape/oval ( not too think or thick)

4. Use a knife to divide into to semi circles

5. Smear little water on the edge of the circle

6. Fold into a cone, seal gently

7. With the seam on your palm facing you

8. Add the potato filling

9. Smear little water on the top of the cone

10. Pinch and seal the cone nice and tight


Frying the samosa:

1. Use a deep fryer or a deep frying pan

2. If you are using thermometer, or a fryer that has one, set it to 375F and then lower it 
    to 350F

3. Slide the samosas into the hot oil, let them cook for about 2 minutes and then flip them   over. Lower the heat and fry for about 4 minutes while you turn them making sure all the       side are golden brown

4. Remove them from the heat, and serve them warm with your favorite mint, coriander  chutney or tamarind sweet and sour chutney


( please watch the video for more visual understanding on how to fold the samosa)