Tuesday, September 5, 2017

TRIO COLOUR VANILLA CAKE

There are somethings you just do not outgrow no matter how old you get. In my case it is this beautiful simple vanilla cake that used to ( and still is) always done with some such beautiful colors which makes it cake very attractive and interesting especially for special occasion.


Growing up in Zanzibar , having a colorful cake for Eid was a must. We all looked forward to visiting family and friends just to enjoy and compare whose house served the prettiest color or served the largest  piece of cake we really did not care much about the taste or texture.

Looking at this cake one might get intrigued, it is just like any spongy, moist and fluffy vanilla cake with a hit of orange zest which gives it a  whole new level of intensity yet balanced with flavors and freshness. It is not too sweet and can hold on without any kind of frosting , its perfect with evening tea or brunch item.

I am going to share the recipe with you so you can be the judge of it.


Recipe:

4 ½ cups/563 gms all-purpose flour
4 tps baking powder
1 tsp baking soda
½ tsp salt
1 and ½ cups butter (3 sticks) 340gms
3 cups/600gms sugar
1 ½ cups milk /350ml
2 tsp vanilla essence
½ tsp orange zest (optional)


Method:

Pre-heat oven on 350F/175C, line up the baking bap with parchment paper or grease the pan with butter or shorting and then dust some flour 


1. Sift the flour twice, add baking powder , baking soda and salt. Keep it a side

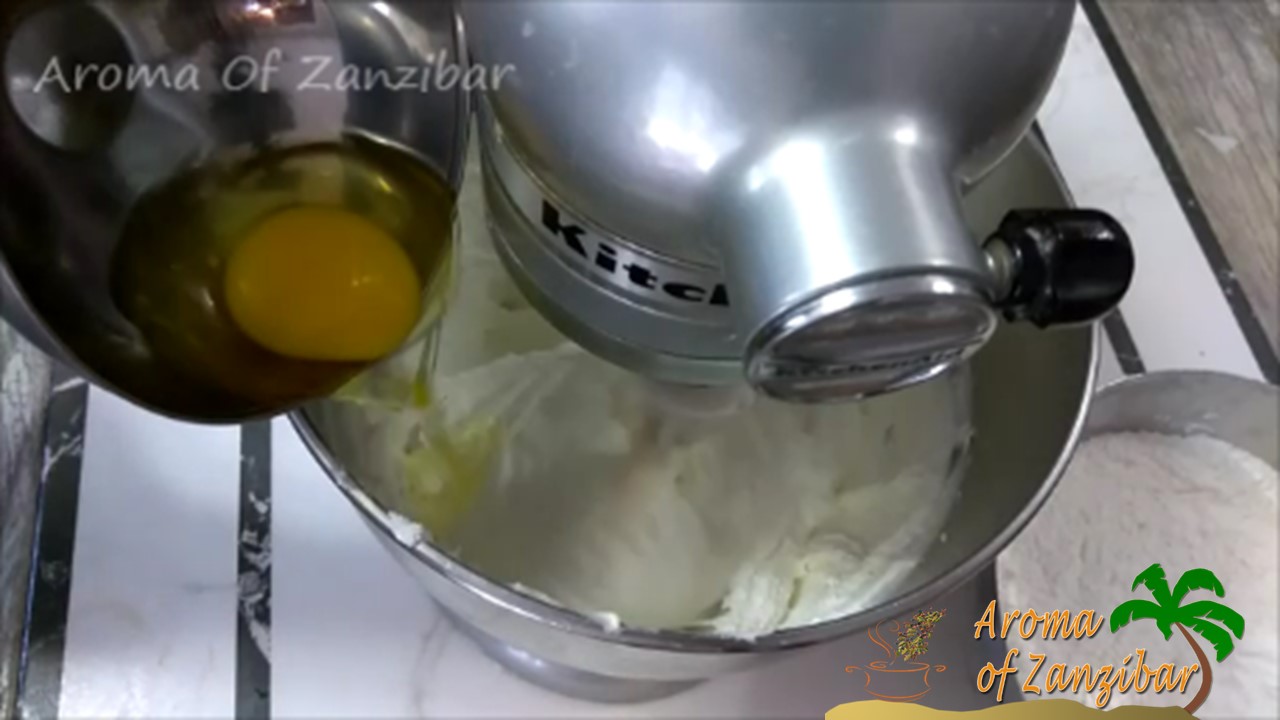
2. In a large bowl cream the butter and sugar until light and fluffy ( this can be done with a stand mixer or electric hand mixer) on a low speed. Scrape the bowl

3. Add one egg at a time on low speed, beating well after each addition until well combined

4. While the mixer is still on low speed , add the milk slowly and gradually, add the vanilla extract and orange zest. Increase the speed and continue mixing for about 2 minutes.

5.  Fold in the flour  gently  in small potions (about 1/2 cup)

6.  Separate the batter into 4 portions out of which 3 will be about 4 oz into separate bowls and color the batter with your favorite colors

7. Spread the white batter in the prepared pan, add the colored batter in various angles, center and side. Use any sharp tool or batter knife to make a swirl.


8. Tap down the pan 2-3 to release any air bubbles

9. Bake at 350F/175C for 40-45 minutes

10. Once it has cooled down, 
release the cake from the pan and slice it in any size you desire


For visual tutorial please press the link below


Sunday, July 16, 2017

KAIMATI/LUQAIMAT ( SWEET DUMPLINGS)


Kaimati or also known as luqaimat/lugaimat in Arabic are sweet crispy and fluffy fried dumplings which are coated and drizzled with an aromatic sugar syrup.  These inviting sweet dumplings are very popular in many Arab and African countries , and the preparation is the similar but differ with very minor ingredients as well as technique to some degree.

The Kaimatis by nature are not sweet , its the rich golden color sugar syrup coated on them that makes them irresistible both in appearance as well  sweetness and of course the rich flavors and aromas of zaffron and cardamoms are so inviting  sure to make you come back for just one more dumpling.

In Zanzibar the , syrup we (then) used for Kaimatis is very simple with just sugar, water and cardamom and sometimes with Saffron for that rich and luxurious taste. However just like many traditional and authentic delicacies you find modern ways of serving the dish and in this case it the simple sugar syrup has developed into variety of syrups such as date, raisin , caramel and so on.

Kaimatis are  a side sweet dish that is served in many Zanzibari homes for a special lunch or dinner but they are more served during the holly month of Ramadhan as an item to break fast at sunset accompanied by Turkish coffee to help all that sugar roll down.

Growing up making Kaimati was never my 'thing' am not sure why, it was my cousin the seasonal cook, she cooked only in Ramadhan and it was only Kaimati and Katlesi and of-course she mastered them perfectly in shape and sizes  and we all loved them and there would never be a leftover no matter how much she cooked.

A lot of people are apprehensive to make Kaimati because fear of not getting them into the right perfect equal size shapes and  I guess deep down I was one of them too. 2 years after being away from home , I could not take it any longer it was time to face my fears and pull up my sleeves and attack this tiny golden sweet ball that left me restless for a while. The first attempt was not that bad, other than having batter all over me and every utensil in the kitchen. So if you are one of those people who fear of not getting the right shape, brush that aside because once you have served the kaimatis , you will be surprise how fast they will disappear and that will give you room to make them again and again and with more practice you will become perfect.

The basic batter has 3 key ingredients flour, yeast and water as well as oil or ghee but I like to add  more optional ingredients such as plain yogurt and corn starch so they become more crunchy and crispy. The secret to making the best Kaimatis is in the syrup !  

Ingredients:


1 Cup/125 gms All-purpose flour
1 tsp /3.5gms yeast
1 Tbl corn starch
1 Tbls veg oil/ghee
2 Tbls plain yogurt 
1/2 Cup + 1 Tbl water
 ( may vary) 


 For the Syrup   
 1 Cup/200gms Sugar
 1/2 Cup /120ml warm water
 1/4-1/2 tsp crushed or powdered cardamom
 Few strands of Saffron (optional)


For visual tutorial please click the link below:


Wednesday, March 22, 2017

MSANIF - stuffed fried pancakes

Msanif is a stuffed fried pancake , it is served as a starter, side dish or snack and it can also be a little spicy if desired. I understand the original msanif is prepared with all-purpose flour but I have gotten so used to having it done with whole wheat flour simply because my mother does not like white flour so she always substituted many recipes with wheat flour. 


Msanif is one of the original Zanzibari side dish which in my opinion is under presented or perhaps known by various  uncommon names . Msanif is one of the most loved side dish during the holly month of Ramadhan , it is something that you can make ahead of time and can be frozen as well. 

The filling of msanif can vary from ground beef , shredded chicken or beef and while I was narrating for the video I thought of shredded turkey as well so this recipe will certainly come handy after Thanksgiving. 

I have tried this with shredded beef and caramelized onions its absolutely wonderful, am yet to try baking them but its something that I definitely want to try and I will share my results on that.

This is a two part recipe.

Yields 16 - 20 Misanif 

For the batter:


2 Cups/225gms whole wheat flour
1/2 tsp baking soda
1 tsp salt ( or more)
1 egg
2 Tbl Veg oil

1 1/2 cup water 


1. Mix and combine whole wheat flour with baking soda and salt

2. Slightly beat the egg and add into the dry ingredients

3. Add the water, start with 2 cups first, mix well and remove any lumps , add the rest of the water slowly till you get a a light consistency like that of crapes, finish it with the oil and stir.


Cover and let it rest for 3 hours 


For the filling : You can add or omit the spices as per your taste


2 Tbl veg oil
1 Medium size onion - diced
1 1/2 tsp salt or enough to taste
1 tps salt
1 tsp black pepper
1 tsp cumin powder
1 tsp coriander powder
1 Fresh ginger paste
1 tsp fresh garlic powder

1 pound/454gms
Cilantro/Corriander /Dhania leaves


1. Heat the pan on medium , add the oil and the diced 
    onions . Saute for few minutes 
2. Add the salt, black pepper, cumin, coriander powder and
    saute for 2-3 minutes
3. Add the ginger and garlic paste , cook for 2 minutes be-
    careful not to burn the garlic 
4. Add the ground beef and saute , let it cook for about 7 
    minutes or until or the liquid is absorbed 
5. Add chopped cilantro /coriander , mix well . Set it aside
    to cool  


Preparations : You can use any kind of pan , I find it easier to use the pancake pan


1. Pour the batter in the pan ( Medium heat)


2. Let it cook for for about 2 minutes , add the meat ( or any filling of your choice)  before the batter is completely dried

3. Pour the batter on top of the meat to cover and seal the filling Let it cook for another 2 minutes 

4. Flip them over, cook for about 2 minutes


5. Keep them in a tray and fry once they are all done or you can let them cool completely , wrap them individually or in a tight container and freeze for upto 2 weeks. If you choose to freeze please let the msanif thaw in the fridge before you fry them.


6. Shallow or deep fry the Msanif on medium heat for about 5-6 minutes  


Serve warm or room temperature

For visual understanding please click on the link below